Declarative:
React makes it painless to create interactive UIs. Design simple views for each state in your application, and React will efficiently update and render just the right components when your data changes.
Declarative views make your code more predictable and easier to debug.
Component Based
Build encapsulated components that manage their own state, then compose them to make complex UIs.
Since component logic is written in JavaScript instead of templates, you can easily pass rich data through your app and keep state out of the DOM.
Learn via the documentation
The best way to learn React is to take a look at the React documentation. This will be far more indepth than what can be covered here, and will always remain up to date with the framework.
React Best Practices
🐛 1. Keep components small and function-specific
With React, it’s possible to have huge components that execute a number of tasks. But a better way to design components is to keep them small, so that one component corresponds to one function. Ideally, a single component should render a specific bit of your page or modify a particular behavior. There are many advantages to this:
- Function-specific components can be standalone, which makes testing and maintenance easier.
- Each small component can be reused across multiple projects.
- Components executing general functions can be made available to the community.
- With smaller components, it’s easier to implement performance optimizations.
- It’s easier to update smaller components.
- Bigger components have to perform harder and may be difficult to maintain.
The balance between creating one concise component and creating multiple function-specific components can vary from organization to organization. After all, you can have as many components as you want, and recombine them in any way you want to achieve the same end result.
♻️ 2. Reusability is important, so keep creation of new components to the minimum required
By sticking to the rule of one function = one component, you can improve the reusability of components. What this means is that you should skip trying to build a new component for a function if there already exists a component for that function.
By reusing components across your project or across any number of projects, not only will you achieve consistency, you will also have more reliable projects.
![]()
🤝 3. Consolidate duplicate code – DRY your code
A common rule for all code is to keep it as brief and concise as possible.
It’s no different here too, since React best practices also instruct you to keep code brief and precise. One way to do this is to avoid duplication – Don’t Repeat Yourself (DRY).
You can achieve this by scrutinizing the code for patterns and similarities. If you find any, it’s possible you’re repeating code and there’s scope to eliminate duplication. Most likely, a bit of rewriting can make it more concise.
This relies heavily on the reusability principle in React. Let’s say you want to add multiple buttons that contain icons, instead of adding the markup for each button, you can simply use the IconButton component that we shown above. You could even go further by mapping everything into an array.

📝 4. Comment only where necessary
Attach comments to code only where necessary. This is not only in keeping with React best practices, it also serves two purposes at the same time:
It’ll keep code visually clutter free. You’ll avoid a potential conflict between comment and code, if you happen to alter the code at some later point in time. Comments should never be used to preserve old code - this is what Git is for, as version control.
📛 5. Name the component after the function
It’s a good idea to name a component after the function that it executes so that it’s easily recognizable.
For example, ProductPortfolio – it conveys instantly what the component does. On the other hand, if you name the component based on the need for the code, it can confuse you at a future point of time.
Another example, it’s preferable to name a component Avatar so that it can be used anywhere – for authors, users or in comments. Instead, if we name the component AuthorAvatar in the context of its usage, we’d be limiting the utility of that component.
Besides, naming a component after the function makes it more useful to the future maintainers/contributors as it’s more likely to be discovered.
🦒 6. Use capitals for component names
In JSX (a JavaScript extension), the names of the components you create need to begin with uppercase letters. For instance, you’ll name components as SelectButton instead of selectbutton, or Menu instead of menu. We do this so that JSX can identify them differently from default HTML tags.
This also improves the reusability, and readability of components in your project.
🎭 7. Separate stateful aspects from rendering
Components in React can be stateful or stateless. Stateful components store information about the component’s state and provide the necessary context. In contrast, stateless components have no memory and cannot give context to other parts of the UI. They only receive props (inputs) from parent component and return you JSX elements. They are scalable and reusable, and similar to pure function in JavaScript.
One of React best practices is to keep your stateful data-loading logic separate from your rendering stateless logic. It’s better to have one stateful component to load data and another stateless component to display that data. This reduces the complexity of the components.
For example, your app is fetching some data on mount. What you want to do is manage the data in the main component and pass the complex render task to a sub-component as props.
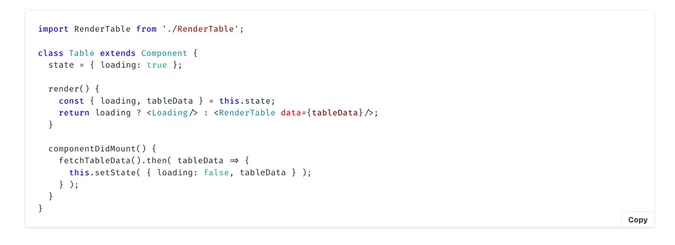
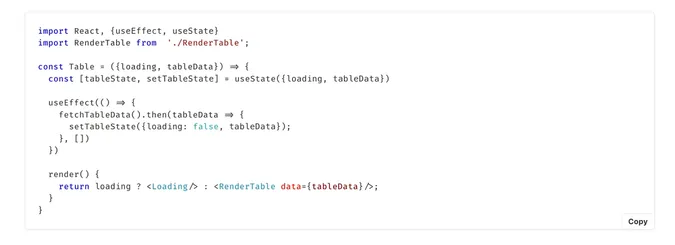
or in ES6
🚀 8. Code should execute as expected and be testable
The code you write should behave as expected, and be testable easily and quickly. It’s a good practice to name your test files identical to the source files with a .test suffix. It’ll then be easy to find the test files.
You can use JEST to test your React code.
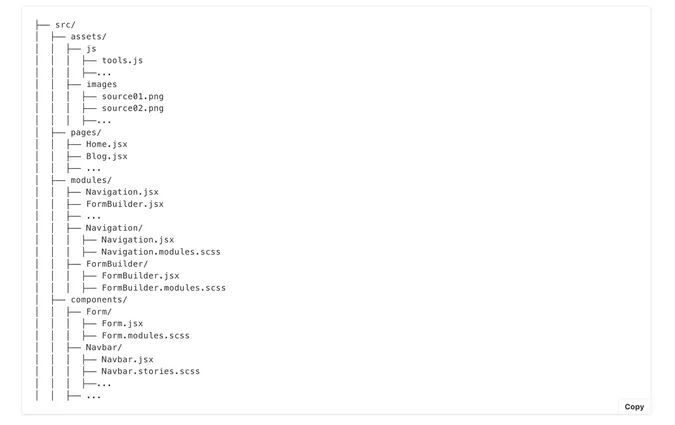
📁 9. All files related to any one component should be in a single folder
Keep all files relating to any one component in a single folder, including styling files.
If there’s any small component used by a particular component only, it makes sense to keep these smaller components all together within that component folder. The hierarchy will then be easy to understand – large components have their own folder and all their smaller parts are split into sub-folders. This way, you can easily extract code to any other project or even modify the code whenever you want.
For instance, for the Form component, all pieces such as CSS files, icons, images, tests and any other sub-components relating to Form should all reside in the same folder. If you name files sensibly, and keep related files together logically, you’ll not have any difficulty finding them later.
Below is an organized structure should be followed
🧰 10. Use tools like StoryBook
One of React best practices that helps to organize all your React components is the use of tools like StoryBook.
These tools help to maintain and reuse code. Beyond that, it helps code to become discoverable, and promotes team collaboration in building components. Also, code can be synced across projects via Github Packages, Azure Artifacts, NPM registry or alternatives.
Always make use of components already available, if not, then make sure your new component may be reused by others by contributing to a component library. This could be your own personal component library that you are able to improve on in iterations, or an open source component library.
📚 11. Use snippet libraries
Code snippets help you to keep up with the best and most recent syntax. They also help to keep your code relatively bug free, snippets also offer a huge productivity boost as you do not need to write components from scratch each time.
There are many snippet libraries that you can use, like, ES7 React, Redux, JS Snippets, etc.
🔗 12. Follow linting rules, break up lines that are too long
Linting is a process wherein we run a program that analyses code for potential errors.
Mostly, we use it for language-related issues. But it can also fix many other issues automatically, particularly code style. Using a linter in your React code helps to keep your code relatively error- and bug-free.
📮 13. Use PropTypes
React PropTypes provide to you and additional collaborators what your component requires to function. Without this, the programmer will have the read the entire component code to understand what types the props makes sense to be. And it’s pretty hard to track all of this. Especially when you have a huge amount of interconnected complex components.
Components with PropTypes also builds automatic documentation, when using such tools such as storybook. In the doc page for the component we can see the API required to consume that component.
📤 14. Data Handling libraries
Redux and React Context are data handling libraries that can be used by React Applications. They allow us to have global variables in our React apps, the benefits of global variables allow us to handle logic far in a much more structured method.
Redux is the far more heavy solution for data handling, however it does provide better performance. Learn about Redux, whilst very powerful, training would be required to understand how to properly use react redux.
Context hooks allows for a very simple solution for data handling. Quick to setup, and straightforward to understand. Perfect, even for newly onboarded developers. Learn about context hooks